
Practice Free AZ-400 Exam Online Questions
Note: This question is part of * series of questions that present the same scenario. Each question in the series contains a unique solution that might meet the stated goals. Some question sett might have more than one correct solution, while others might not have a correct solution.
After you answer a question in this section, you will NOT be able to return to it. As a result, these questions will not appear in the review screen.
You have an approval process that contains a condition. The condition requires that releases be approved by a team leader before they are deployed.
You have a poky stating that approvals must occur within eighthour.
You discover that deployments fail if the approvals take longer than two hours.
You need to ensure that the deployments only fail if the approvals take longer than eight hours.
Solution: From Post-deployment conditions, you modify the Time between re-evaluation of gates option.
Does this meet the goal?
- A . Yes
- B . No
B
Explanation:
Use a gate From Pre-deployment conditions instead.
Reference: https://docs.microsoft.com/en-us/azure/devops/pipelines/release/approvals/gates
SIMULATION
Task 3
You need to create a new team dashboard named Dashboard1 for the default project team of Project1. The dashboard must display the members of the team
Navigate to Azure DevOps:
Go to Azure DevOps and sign in with your credentials.
Select Your Project:
Choose Project1 from your list of projects.
Access Dashboards:
In the left-hand menu, select Dashboards.
Create a New Dashboard:
Click on New Dashboard.
Enter the name Dashboard1.
Ensure the dashboard type is set to Team Dashboard.
Click Create.
Step 2: Add the Team Members Widget
Open the Widget Catalog:
After creating the dashboard, the widget catalog will open automatically. If it doesn’t, click on Add Widget.
Search for Team Members Widget:
In the widget catalog, search for Team Members.
Add the Widget:
Click on the Team Members widget and then click Add to place it on your dashboard.
Configure the Widget:
Once added, you can resize and move the widget to your preferred location on the dashboard.
Step 3: Save and Share the Dashboard
Save the Dashboard:
Click on Save to save your changes.
Share the Dashboard:
You can share the dashboard URL with your team members or set permissions to control who can view or edit the dashboard.
By following these steps, you will have a new team dashboard named Dashboard1 that displays the members of the default project team for Project1
Note: This question is part of a series of questions that present the same scenario. Each question in the series contains a unique solution that might meet the stated goals. Some question sets might have more than one correct solution, while others might not have a correct solution.
After you answer a question in this section, you will NOT be able to return to it. As a result, these questions will not appear in the review screen.
Your company uses Azure DevOps to manage the build and release processes for applications.
You use a Git repository for applications source control.
You need to implement a pull request strategy that reduces the history volume in the master branch.
Solution: You implement a pull request strategy that uses an explicit merge.
Does this meet the goal?
- A . Yes
- B . No
B
Explanation:
Instead use fast-forward merge.
Note:
No fast-forward merge – This option merges the commit history of the source branch when the pull request closes and creates a merge commit in the target branch.
Reference: https://docs.microsoft.com/en-us/azure/devops/repos/git/branch-policies
DRAG DROP
You are implementing a package management solution for a Node.js application by using Azure Artifacts.
You need to configure the development environment to connect to the package repository. The solution must minimize the likelihood that credentials will be leaked.
Which file should you use to configure each connection? To answer, drag the appropriate files to the correct connections. Each file may be used once, more than once, or not at all. You may need to drag the split bar between panes or scroll to view content. NOTE: Each correct selection is worth one point.
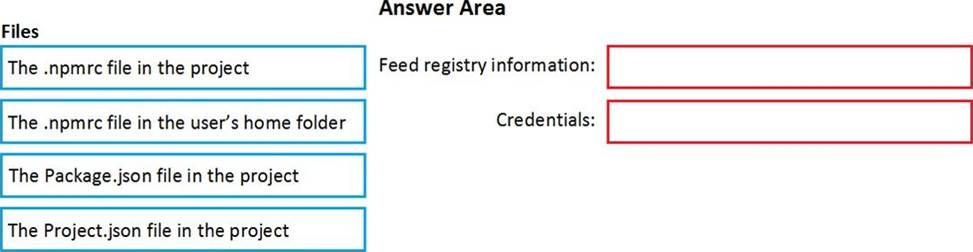
Explanation:
All Azure Artifacts feeds require authentication, so you’ll need to store credentials for the feed before you can install or publish packages. npm uses .npmrc configuration files to store feed URLs and credentials. Azure DevOps Services recommends using two .npmrc files.
Feed registry information: The .npmrc file in the project
One .npmrc should live at the root of your git repo adjacent to your project’s package.json. It should contain a "registry" line for your feed and it should not contain credentials since it will be checked into git.
Credentials: The .npmrc file in the user’s home folder
On your development machine, you will also have a .npmrc in $home for Linux or Mac systems or $env.HOME for win systems. This .npmrc should contain credentials for all of the registries that you need to connect to. The NPM client will look at your project’s .npmrc, discover the registry, and fetch matching credentials from $home/.npmrc or $env.HOME/.npmrc.
References: https://docs.microsoft.com/en-us/azure/devops/artifacts/npm/npmrc?view=azure-devops&tabs=windows
You have an Azure subscription that contains an Azure Pipelines pipeline named Pipeline1 and an app named App1. Pipeline1 is used to automate the building of App1.
You have a Slack channel named App1chat that includes an incoming webhook.
You need to ensure that when a successful build of App1 is created, a notification is sent to App1chat by using the webhook.
What should you use?
- A . an alert rule
- B . a notification
- C . an action group
- D . a subscription
During a code review, you discover quality issues in a Java application.
You need to recommend a solution to detect quality issues including unused variables and empty catch blocks.
What should you recommend?
- A . In an Xcode build task, select Use xcpretty from Advanced.
- B . In a Maven build task, select Run PMD.
- C . In a Grunt build task, select Enabled from Control Options.
- D . In a Gulp build task, specify a custom condition expression.
B
Explanation:
PMD is a source code analyzer. It finds common programming flaws like unused variables, empty catch blocks, unnecessary object creation, and so forth.
There is an Apache Maven PMD Plugin which allows you to automatically run the PMD code analysis tool on your project’s source code and generate a site report with its results.
SIMULATION
Task 1
Navigate to aex.dev.azure.com and specify the following credentials:
• [email protected]
• Password: aFpJ2j-6M!
Use the default setting to sign up for Azure DevOps and create an Azure DevOps organization. Once the organization is created. create a private project named Project1.
You need to ensure that the maximum file size for all the Azure DevOps repositories of Project1 is 2 MB.
Open your browser and navigate to https://aex.dev.azure.com. You will be prompted to sign in. Enter the following credentials: Username: [email protected] Password: aFpJ2j-6M!
Click Next or Sign in to proceed.
Note: If you see any Microsoft security challenge (like phone or email verification), follow the instructions to complete it.
Step 2: Sign Up for Azure DevOps
After signing in, you’ll see a prompt to sign up for Azure DevOps.
Use the default settings provided by Azure DevOps for the sign-up process (region, default name, etc.).
Click Continue or Start free with Azure DevOps.
An Azure DevOps Organization is a container for your projects and resources. Default settings are usually fine for new organizations.
Step 3: Create the Organization
Enter a name for your organization. Azure DevOps will suggest a default name (like yourname or org-name), but you can change it if you prefer.
Verify the region is correct.
Click Continue to create the organization.
Your Azure DevOps organization is now created. It’s the top-level container for all your projects.
Step 4: Create a Private Project Named Project1
In your Azure DevOps portal, find the "New Project" button and click it.
Enter the following details:
Project Name: Project1
Description: (optional)
Visibility: Private
Click Create.
A private project means that only users you add can see or access it. This is important for security and privacy.
Step 5: Enforce Maximum File Size for Repositories
By default, Azure DevOps allows files up to 100 MB to be pushed. To ensure the maximum file size for repositories in Project1 is 2 MB, you can enforce this using a pipeline validation.
Azure DevOps does not provide a direct setting for file size limits. However, you can create a pipeline to validate file size on pull requests and block changes if a file exceeds 2 MB.
Here’s how to do it:
Option 1: Enforce with a pipeline validation for pull requests
In your Project1, create a new pipeline.
Use the following YAML for the pipeline:
yaml
Copy
trigger: none
pr:
branches:
include:
– "*"
jobs:
– job: CheckFileSize pool:
vmImage: ‘ubuntu-latest’
steps:
– script: |
echo "Checking file sizes in the PR…"
git fetch origin +refs/pull/*/merge:refs/remotes/origin/pr/*
large_files=$(git diff –cached –name-only | xargs -I{} du -b {} | awk ‘$1 > 2097152 {print $2}’) if [ -n "$large_files" ]; then
echo "Error: The following files exceed 2 MB:"
echo "$large_files"
exit 1
fi
display Name: ‘Check file sizes in PR’
This pipeline will:
Run on pull requests only.
Check the size of all files in the pull request.
If any file is larger than 2 MB (2,097,152 bytes), it will fail the pipeline and block the PR.
Option 2: Local Git configuration (for each developer)
On each developer’s machine, run this command in their local repository:
bash
Copy
git config –local core.bigFileThreshold 2M
This limits the file threshold for checkout, but does not prevent large files from being pushed. Using the pipeline validation (Option 1) is more secure for team environments.
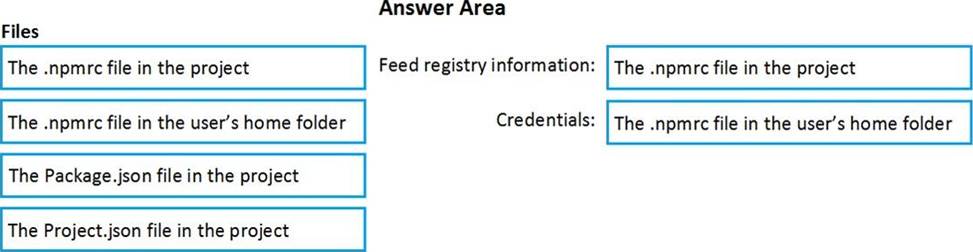
DRAG DROP
You mc configuring Azure DevOps build pipelines.
You plan to use hosted build agents.
Which build agent pool should you use to compile each application type? To answer, drag the appropriate built agent pools to the correct application types. Each butt agent pool may be used once, more than once, or not at all. You may need to drag the split bar between panes or scroll to view content. NOTE: Each correct selection is worth one point.
Explanation:
Box 1: Hosted macOS
Hosted macOS pool (Azure Pipelines only): Enables you to build and release on macOS without having to configure a self-hosted macOS agent. This option affects where your data is stored.
Box 2: Hosted
Hosted pool (Azure Pipelines only): The Hosted pool is the built-in pool that is a collection of Microsoft-hosted agents.
Incorrect Answers:
Default pool: Use it to register self-hosted agents that you’ve set up.
Hosted Windows Container pool (Azure Pipelines only): Enabled you to build and release inside Windows containers. Unless you’re building using containers, Windows builds should run in the Hosted VS2017 or Hosted pools.
Reference: https://docs.microsoft.com/en-us/azure/devops/pipelines/agents/v2-osx