
Practice Free AZ-400 Exam Online Questions
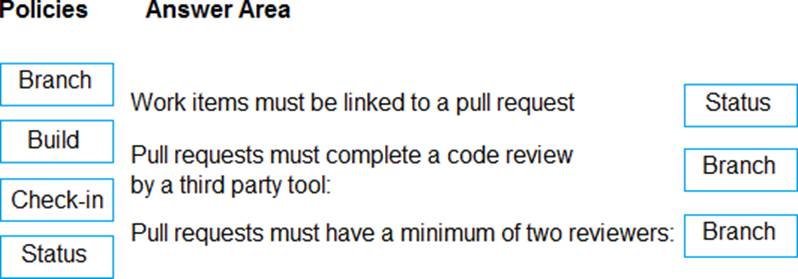
DRAG DROP
You create a Git repository named Repo1 in Azure Repos.
You need to configure Repo1 to meet the following requirements:
• Work items must be linked to a pull request.
• Pull requests must have a minimum of two reviewers.
• Pull requests must complete a code review by using a thirty-party tool.
The solution must minimize administrative effort.
Which type of policy should you use for each requirement? To answer, drag the appropriate policy types to the correct requirements. Each policy type may be used once, more than once, or not at all. You may need to drag the split bar between panes or scroll to view content.
SIMULATION
Task 8
In Project1, you need to create a service hook that will integrate with Azure Storage.
Use the queue1 queue from the storage48901628 storage account.
explanation below
Explanation:
Task 8: Create a Service Hook to Integrate with Azure Storage (queue1)
Step 1: Verify the Storage Account and Queue
In the Azure portal (https://portal.azure.com):
Go to Storage accounts.
Find the storage48901628 storage account.
In the left menu, click on Queues.
Ensure that a queue named queue1 exists.
If not, create it by:
Clicking + Queue.
Enter Name: queue1.
Click OK.
Step 2: Prepare the Storage Account’s Shared Access Signature (SAS) Azure DevOps uses SAS tokens to send messages to a storage queue. In the Azure portal, go to the storage48901628 storage account. In the left menu, click Shared access signature.
Set the following:
Allowed services: Queue.
Allowed resource types: Object.
Allowed permissions: Add, Write.
Start and expiry date/time: Adjust as needed (e.g., 1 year).
Click Generate SAS and connection string.
Copy the Queue SAS URL (e.g., https://storage48901628.queue.core.windows.net/queue1?sv=…).
Step 3: Create the Service Hook in Azure DevOps
In your Azure DevOps Project (Project1):
In the bottom-left, click Project settings.
In the left menu, click Service hooks.
Click + Create subscription.
Step 4: Configure the Azure Storage Service Hook
In the Create a subscription wizard, choose Azure Storage Queues and click Next.
Choose the Trigger:
For example: Code pushed (or other events you want to send to the queue).
Click Next.
Configure the Action:
Queue endpoint URL: The Queue SAS URL you copied in Step 2 (including the queue1 endpoint and
SAS token).
Example:
bash
Copy
https://storage48901628.queue.core.windows.net/queue1?sv=…
Step 5: Finalize and Test the Integration
Click Test to ensure Azure DevOps can send a message to the queue.
If the test succeeds, click Finish to create the service hook.
Step 6: Validate in the Azure Portal
In the Azure portal, go to storage48901628 > Queues > queue1.
You should see new messages appear in the queue whenever the configured Azure DevOps event (like push or PR) occurs.
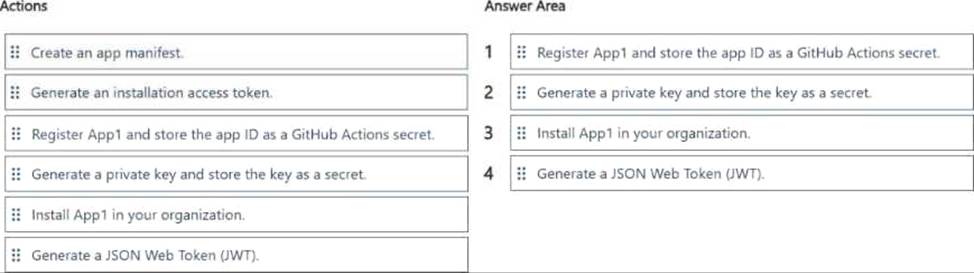
DRAG DROP
You have a GitHub organization.
You ate creating a GitHub Actions workflow.
You need to perform authenticated AP1 requests by using a GitHub app name App1.
Which four actions should you perform in sequence? To answer, move the appropriate actions from the list of actions to the answer area and arrange them in the correct order.
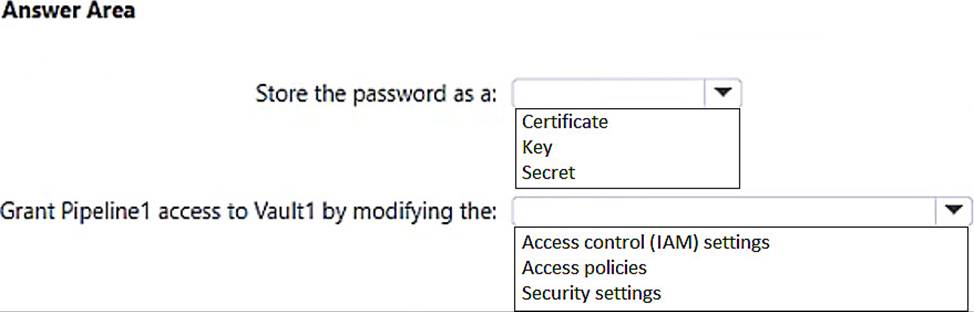
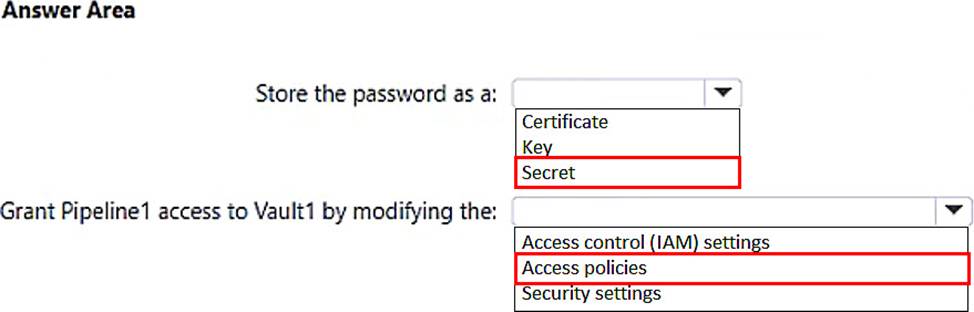
HOTSPOT
You have an Azure subscription that contains an Azure key vault named Vault1. an Azure pipeline named Pipeline1, and an Azure SQL database named DB1.
Pipeline1 is used to deploy an app that will authenticate to DB1 by using a password.
You need to store the password in Vault1. The solution must ensure that the password can be accessed by Pipeline1.
What should you do? To answer, select the appropriate options in the answer area. NOTE: Each correct selection is worth one point.
Note: This question n part of a series of questions that present the same scenario. Each question in the series contains a unique solution that might meet the stated goals. Some question sets might have more than one correct solution, while others might not have a correct solution.
After you answer a question in this section, you will NOT be able to return to it. As a result these questions will not appear in the review screen.
You have an approval process that contains a condition. The condition requires that releases be approved by a team leader before they are deployed.
You have a policy stating that approvals must occur within eight hours.
You discover that deployments fail if the approvals lake longer than two hours.
You need to ensure that the deployments only fail if the approvals take longer than eight hours. Solution: From Pre-deployment conditions, you modify the Timeout setting for pre-deployment approvals.
Does this meet the goal?
- A . Yes
- B . No
B
Explanation:
Use a gate instead of an approval instead.
Reference: https://docs.microsoft.com/en-us/azure/devops/pipelines/release/approvals/gates
You manage code by using GitHub.
You plan to use Dependabot to scan for code dependencies.
You need to identify when scanning will be triggered automatically.
Which two actions will trigger a scan? Each correct answer presents a complete solution. NOTE: Each correct solution is worth one point
- A . The dependency graph of a repository changes.
- B . Any commit is pushed.
- C . A branch is forked.
- D . A pull request is created.
- E . A new advisory is added.
You add the virtual machines as managed nodes in Azure Automation State Configuration.
You need to configure the computer in Group7.
What should you do?
- A . Run the Register-AzureRmAutomationDscNodeAzure Powershell cmdlet.
- B . Modify the ConfigurationMode property of the Local Configuration Manager (LCM).
- C . Install PowerShell Core.
- D . Modify the RefreshMode property of the Local Configuration Manager (LCM).
A
Explanation:
The Register-AzureRmAutomationDscNode cmdlet registers an Azure virtual machine as an APS Desired State Configuration (DSC) node in an Azure Automation account.
Scenario: The Azure DevOps organization includes:
The Docker extension
A deployment pool named Pool7 that contains10 Azure virtual machines that run Windows Server 2016

Reference: https://docs.microsoft.com/en-us/powershell/module/azurerm.automation/register-azurermautomationdscnode
SIMULATION
You need to configure an Azure web app named az400-9940427-main to contain an environmental variable named “MAX_ITEMS”. The environmental variable must have a value of 50.
To complete this task, sign in to the Microsoft Azure portal.
Note: This section contains one or more sets of questions with the same scenario and problem. Each question presents a unique solution to the problem. You must determine whether the solution meets the stated goals. More than one solution in the set might solve the problem. It is also possible that none of the solutions in the set solve the problem.
After you answer a question in this section, you will NOT be able to return. As a result, these questions do not appear on the Review Screen.
You have an on-premises web server named Server1.
You need to ensure that you can build .NET apps and deploy the apps to Server1 by using Azure Pipelines.
Solution: You deploy a virtual machine scale set and select a custom Ubuntu image that includes the .NET command-line interface (CU) tools.
Does this meet the goal?
- A . Yes
- B . No
SIMULATION
Task 8
Initialize the default main branch, if it does not exist already.
In Project 1, you need to create a new Azure Pipelines YAML pipeline by using the ASP.NET template. The pipeline must use Azure Repos as the hosting platform and must be created in a new branch named azure-pipelines.
Navigate to Azure DevOps:
Go to Azure DevOps and sign in with your credentials.
Select Your Project:
Choose Project1 from your list of projects.
Initialize the Main Branch:
Go to Repos > Files.
If the main branch does not exist, you will see an option to initialize it. Click on Initialize and follow
the prompts to create the main branch1.
Step 2: Create a New Branch for the Pipeline
Navigate to Branches:
Go to Repos > Branches.
Click on New branch.
Create the Branch:
Enter azure-pipelines as the branch name.
Select main as the base branch.
Click Create2.
Step 3: Create a New Azure Pipelines YAML Pipeline
Navigate to Pipelines:
Go to Pipelines > New pipeline.
Select the Repository:
Choose Azure Repos Git and select the relevant repository.
Configure the Pipeline:
Select Starter pipeline.
Replace the default YAML with the ASP.NET template. You can find the ASP.NET template in the Azure Pipelines documentation oruse the following example: trigger:
– main pool:
vmImage: ‘windows-latest’
variables:
buildConfiguration: ‘Release’
steps:
– task: UseDotNet@2 inputs: packageType: ‘sdk’ version: ‘5.x’
installationPath: $(Agent.ToolsDirectory)/dotnet
– script: |
dotnet build –configuration $(buildConfiguration)
displayName: ‘Build project’
– script: |
dotnet test –no-build –configuration $(buildConfiguration)
displayName: ‘Run tests’
Save the Pipeline:
Click on Save and enter azure-pipelines as the branch name.
Click on Save and run to save the pipeline to the new branch named azure-pipelines3.
By following these steps, you will have successfully initialized the main branch, created a new branch named azure-pipelines, and set up a new Azure Pipelines YAML pipeline using the ASP.NET template