
Practice Free ARA-C01 Exam Online Questions
An Architect has a design where files arrive every 10 minutes and are loaded into a primary database table using Snowpipe. A secondary database is refreshed every hour with the latest data from the primary database.
Based on this scenario, what Time Travel query options are available on the secondary database?
- A . A query using Time Travel in the secondary database is available for every hourly table version within the retention window.
- B . A query using Time Travel in the secondary database is available for every hourly table version within and outside the retention window.
- C . Using Time Travel, secondary database users can query every iterative version within each hour (the individual Snowpipe loads) in the retention window.
- D . Using Time Travel, secondary database users can query every iterative version within each hour (the individual Snowpipe loads) and outside the retention window.
A
Explanation:
Snowflake’s Time Travel feature allows users to query historical data within a defined retention period. In the given scenario, since the secondary database is refreshed every hour, Time Travel can be used to query each hourly version of the table as long as it falls within the retention window. This does not include individual Snowpipe loads within each hour unless they coincide with the hourly refresh.
Reference: The answer is verified using Snowflake’s official documentation, which provides detailed information on Time Travel and its usage within the retention period123.
When using the copy into <table> command with the CSV file format, how does the match_by_column_name parameter behave?
- A . It expects a header to be present in the CSV file, which is matched to a case-sensitive table column name.
- B . The parameter will be ignored.
- C . The command will return an error.
- D . The command will return a warning stating that the file has unmatched columns.
B
Explanation:
Option B is the best design to meet the requirements because it uses Snowpipe to ingest the data continuously and efficiently as new records arrive in the object storage, leveraging event notifications. Snowpipe is a service that automates the loading of data from external sources into Snowflake tables1. It also uses streams and tasks to orchestrate transformations on the ingested data. Streams are objects that store the change history of a table, and tasks are objects that execute SQL statements on a schedule or when triggered by another task2. Option B also uses an external function to do model inference with Amazon Comprehend and write the final records to a Snowflake table. An external function is a user-defined function that calls an external API, such as Amazon Comprehend, to perform computations that are not natively supported by Snowflake3. Finally,
option B uses the Snowflake Marketplace to make the de-identified final data set available publicly for advertising companies who use different cloud providers in different regions. The Snowflake Marketplace is a platform that enables data providers to list and share their data sets with data consumers, regardless of the cloud platform or region they use4.
Option A is not the best design because it uses copy into to ingest the data, which is not as efficient and continuous as Snowpipe. Copy into is a SQL command that loads data from files into a table in a single transaction. It also exports the data into Amazon S3 to do model inference with Amazon Comprehend, which adds an extra step and increases the operational complexity and maintenance of the infrastructure.
Option C is not the best design because it uses Amazon EMR and PySpark to ingest and transform the data, which also increases the operational complexity and maintenance of the infrastructure. Amazon EMR is a cloud service that provides a managed Hadoop framework to process and analyze large-scale data sets. PySpark is a Python API for Spark, a distributed computing framework that can run on Hadoop. Option C also develops a python program to do model inference by leveraging the Amazon Comprehend text analysis API, which increases the development effort.
Option D is not the best design because it is identical to option A, except for the ingestion method. It still exports the data into Amazon S3 to do model inference with Amazon Comprehend, which adds an extra step and increases the operational complexity and maintenance of the infrastructure.
Reference: 1: Snowpipe Overview 2: Using Streams and Tasks to Automate Data Pipelines 3: External Functions Overview 4: Snowflake Data Marketplace Overview: [Loading Data Using COPY INTO] : [What is Amazon EMR?] : [PySpark Overview]
The copy into <table> command is used to load data from staged files into an existing table in Snowflake. The command supports various file formats, such as CSV, JSON, AVRO, ORC, PARQUET, and XML1.
The match_by_column_name parameter is a copy option that enables loading semi-structured data into separate columns in the target table that match corresponding columns represented in the source data. The parameter can have one of the following values2:
CASE_SENSITIVE: The column names in the source data must match the column names in the target table exactly, including the case. This is the default value.
CASE_INSENSITIVE: The column names in the source data must match the column names in the target table, but the case is ignored.
NONE: The column names in the source data are ignored, and the data is loaded based on the order of the columns in the target table.
The match_by_column_name parameter only applies to semi-structured data, such as JSON, AVRO, ORC, PARQUET, and XML. It does not apply to CSV data, which is considered structured data2. When using the copy into <table> command with the CSV file format, the match_by_column_name parameter behaves as follows2:
It expects a header to be present in the CSV file, which is matched to a case-sensitive table column name. This means that the first row of the CSV file must contain the column names, and they must match the column names in the target table exactly, including the case. If the header is missing or does not match, the command will return an error.
The parameter will not be ignored, even if it is set to NONE. The command will still try to match the column names in the CSV file with the column names in the target table, and will return an error if they do not match.
The command will not return a warning stating that the file has unmatched columns. It will either load the data successfully if the column names match, or return an error if they do not match.
Reference:
1: COPY INTO <table> | Snowflake Documentation
2: MATCH_BY_COLUMN_NAME | Snowflake Documentation
A company has a table with that has corrupted data, named Data. The company wants to recover the data as it was 5 minutes ago using cloning and Time Travel.
What command will accomplish this?
- A . CREATE CLONE TABLE Recover_Data FROM Data AT(OFFSET => -60*5);
- B . CREATE CLONE Recover_Data FROM Data AT(OFFSET => -60*5);
- C . CREATE TABLE Recover_Data CLONE Data AT(OFFSET => -60*5);
- D . CREATE TABLE Recover Data CLONE Data AT(TIME => -60*5);
C
Explanation:
This is the correct command to create a clone of the table Data as it was 5 minutes ago using cloning and Time Travel. Cloning is a feature that allows creating a copy of a database, schema, table, or view without duplicating the data or metadata. Time Travel is a feature that enables accessing historical data (i.e. data that has been changed or deleted) at any point within a defined period.
To create a clone of a table at a point in time in the past, the syntax is:
CREATE TABLE <clone_name> CLONE <source_table> AT (OFFSET => <offset_in_seconds>);
The OFFSET parameter specifies the time difference in seconds from the present time. A negative value indicates a point in the past. For example, -60*5 means 5 minutes ago. Alternatively, the TIMESTAMP parameter can be used to specify an exact timestamp in the past. The clone will contain the data as it existed in the source table at the specified point in time12.
Reference: Snowflake Documentation: Cloning Objects
Snowflake Documentation: Cloning Objects at a Point in Time in the Past
Support for Payment Card Industry Data Security Standards (PCI DSS)
In order to provide all the listed services, what is the MINIMUM Snowflake edition that should be selected during account creation?
- A . Standard
- B . Enterprise
- C . Business Critical
- D . Virtual Private Snowflake (VPS)
C
Explanation:
According to the Snowflake documentation1, the Business Critical edition offers the following features that are relevant to the question:
Support for Multi-Factor Authentication (MFA): This is a standard feature available in all Snowflake editions1. A minimum of 2 months of Time Travel availability: This is an enterprise feature that allows users to access historical data for up to 90 days1.
Database replication in between different regions: This is an enterprise feature that enables users to replicate databases across different regions or cloud platforms1.
Native support for JDBC and ODBC: This is a standard feature available in all Snowflake editions1.
Customer-managed encryption keys using Tri-Secret Secure: This is a business critical feature that provides enhanced security and data protection by allowing customers to manage their own encryption keys1.
Support for Payment Card Industry Data Security Standards (PCI DSS): This is a business critical feature that ensures compliance with PCI DSS regulations for handling sensitive cardholder data1. Therefore, the minimum Snowflake edition that should be selected during account creation to provide all the listed services is the Business Critical edition.
Reference: Snowflake Editions | Snowflake Documentation
When activating Tri-Secret Secure in a hierarchical encryption model in a Snowflake account, at what level is the customer-managed key used?
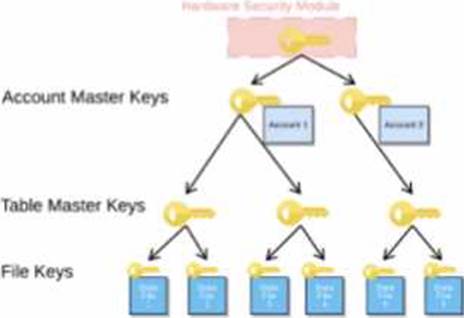
- A . At the root level (HSM)
- B . At the account level (AMK)
- C . At the table level (TMK)
- D . At the micro-partition level
B
Explanation:
Tri-Secret Secure is a feature that allows customers to use their own key, called the customer-managed key (CMK), in addition to the Snowflake-managed key, to create a composite master key that encrypts the data in Snowflake. The composite master key is also known as the account master key (AMK), as it is unique for each account and encrypts the table master keys (TMKs) that encrypt the file keys that encrypt the data files. The customer-managed key is used at the account level, not at the root level, the table level, or the micro-partition level. The root level is protected by a hardware security module (HSM), the table level is protected by the TMKs, and the micro-partition level is protected by the file keys12.
Reference: Understanding Encryption Key Management in Snowflake Tri-Secret Secure FAQ for Snowflake on AWS
A company is using a Snowflake account in Azure. The account has SAML SSO set up using ADFS as a SCIM identity provider.
To validate Private Link connectivity, an Architect performed the following steps:
* Confirmed Private Link URLs are working by logging in with a username/password account
* Verified DNS resolution by running nslookups against Private Link URLs
* Validated connectivity using SnowCD
* Disabled public access using a network policy set to use the company’s IP address range However, the following error message is received when using SSO to log into the company account: IP XX.XXX.XX.XX is not allowed to access snowflake. Contact your local security administrator.
What steps should the Architect take to resolve this error and ensure that the account is accessed using only Private Link? (Choose two.)
- A . Alter the Azure security integration to use the Private Link URLs.
- B . Add the IP address in the error message to the allowed list in the network policy.
- C . Generate a new SCIM access token using system$generate_scim_access_token and save it to Azure AD.
- D . Update the configuration of the Azure AD SSO to use the Private Link URLs.
- E . Open a case with Snowflake Support to authorize the Private Link URLs’ access to the account.
B, D
Explanation:
The error message indicates that the IP address in the error message is not allowed to access Snowflake because it is not in the allowed list of the network policy. The network policy is a feature that allows restricting access to Snowflake based on IP addresses or ranges.
To resolve this error, the Architect should take the following steps:
Add the IP address in the error message to the allowed list in the network policy. This will allow the IP address to access Snowflake using the Private Link URLs. Alternatively, the Architect can disable the network policy if it is not required for security reasons.
Update the configuration of the Azure AD SSO to use the Private Link URLs. This will ensure that the SSO authentication process uses the Private Link URLs instead of the public URLs. The configuration can be updated by following the steps in the Azure documentation1.
These two steps should resolve the error and ensure that the account is accessed using only Private Link. The other options are not necessary or relevant for this scenario. Altering the Azure security integration to use the Private Link URLs is not required because the security integration is used for SCIM provisioning, not for SSO authentication. Generating a new SCIM access token using
system$generate_scim_access_token and saving it to Azure AD is not required because the SCIM access token is used for SCIM provisioning, not for SSO authentication. Opening a case with Snowflake Support to authorize the Private Link URLs’ access to the account is not required because the authorization can be done by the account administrator using the SYSTEM$AUTHORIZE_PRIVATELINK function2.
What step will improve the performance of queries executed against an external table?
- A . Partition the external table.
- B . Shorten the names of the source files.
- C . Convert the source files’ character encoding to UTF-8.
- D . Use an internal stage instead of an external stage to store the source files.
A
Explanation:
Partitioning an external table is a technique that improves the performance of queries executed against the table by reducing the amount of data scanned. Partitioning an external table involves creating one or more partition columns that define how the table is logically divided into subsets of data based on the values in those columns. The partition columns can be derived from the file metadata (such as file name, path, size, or modification time) or from the file content (such as a column value or a JSON attribute). Partitioning an external table allows the query optimizer to prune the files that do not match the query predicates, thus avoiding unnecessary data scanning and processing2
The other options are not effective steps for improving the performance of queries executed against an external table:
Shorten the names of the source files. This option does not have any impact on the query performance, as the file names are not used for query processing. The file names are only used for creating the external table and displaying the query results3
Convert the source files’ character encoding to UTF-8. This option does not affect the query performance, as Snowflake supports various character encodings for external table files, such as UTF-8, UTF-16, UTF-32, ISO-8859-1, and Windows-1252. Snowflake automatically detects the character encoding of the files and converts them to UTF-8 internally for query processing4
Use an internal stage instead of an external stage to store the source files. This option is not applicable, as external tables can only reference files stored in external stages, such as Amazon S3, Google Cloud Storage, or Azure Blob Storage. Internal stages are used for loading data into internal tables, not external tables5
Reference:
1: SnowPro Advanced: Architect | Study Guide
2: Snowflake Documentation | Partitioning External Tables
3: Snowflake Documentation | Creating External Tables
4: Snowflake Documentation | Supported File Formats and Compression for Staged Data Files
5: Snowflake Documentation | Overview of Stages
: SnowPro Advanced: Architect | Study Guide
: Partitioning External Tables
: Creating External Tables
: Supported File Formats and Compression for Staged Data Files
: Overview of Stages