
Practice Free UIPATH-ADPV1 Exam Online Questions
Which of the following is a tag in a selector?
- A . id=’selMonth’
- B . aaname=’FirstName’
- C . <html app-msedge.exe’ title-Find Unicorn Name’ />
- D . class-down-chevron set-font’
C
Explanation:
A tag in a selector is a node that represents a UI element or a container of UI elements. A tag has the following format: <ui_system attr_name_1=’attr_value_1′ … attr_name_N=’attr_value_N’/>. A tag can have one or more attributes that help identify the UI element uniquely and reliably1. For example, the tag <html app-msedge.exe’ title-Find Unicorn Name’ /> represents the HTML document of a web page opened in Microsoft Edge browser, with the title “Find Unicorn Name”. The attributes app-msedge.exe and title-Find Unicorn Name help distinguish this tag from other HTML documents.
The other options are not tags, but attributes. An attribute is a property of a UI element that has a name and a value. For example, id=’selMonth’ is an attribute that indicates the ID of a UI element is “selMonth”. Attributes are used inside tags to specify the UI element or container1.
Reference: 1: Studio – About Selectors – UiPath Documentation Portal
Which part of a test case that is using BDD (Behavioral-Driven Development) template structure supports the Surround with mock feature?
- A . Then
- B . Setup
- C . When
- D . Given
B
Explanation:
In the BDD (Behavioral-Driven Development) template structure, the "Setup" part of a test case supports the Surround with mock feature. This section is used to set up the testing environment, including mock configurations.
At indication time, the Strict Selector has the following functionalities available:
- A . Refresh, Open in UiExplorer, Copy to clipboard.
- B . Ignore text. Copy to clipboard. Show all matches.
- C . Open in UiExplorer, Copy to clipboard, Show all matches.
- D . Accuracy, Open in UiExplorer, Copy to clipboard. Show all matches.
C
Explanation:
The Strict Selector is a targeting method that uses the selector information of a UI element to identify it on the screen. It is one of the four targeting methods available in UiPath Studio, along with Fuzzy Selector, Image, and Computer Vision1. The Strict Selector is considered to be the most reliable and stable targeting method, as it uses the attributes and properties of the UI element that are unlikely to change2.
At indication time, the Strict Selector has the following functionalities available:
Open in UiExplorer: This option opens the UiPath Explorer window, where you can inspect and edit the selector information of the indicated UI element, as well as use advanced features such as anchors, wildcards, variables, and regex3.
Copy to clipboard: This option copies the selector information of the indicated UI element to the clipboard, so you can paste it elsewhere, such as in a text editor or another activity.
Show all matches: This option highlights all the UI elements on the screen that match the selector information of the indicated UI element. This helps you to check if there are any duplicates that
might cause the automation to fail at runtime. You can also use the Ignore text option to exclude the text attribute from the selector information, which might reduce the number of matches4. The other options are incorrect because:
Option A is incorrect because it does not include the Show all matches option, which is available for the Strict Selector.
Option B is incorrect because it does not include the Open in UiExplorer option, which is available for the Strict Selector.
Option D is incorrect because it includes the Accuracy option, which is not available for the Strict Selector. The Accuracy option is only available for the Image targeting method, which allows you to adjust the similarity threshold between the indicated image and the target image5.
Reference: Studio – Targeting Methods – UiPath Documentation Portal Studio – Strict Selector – UiPath Documentation Portal Studio – UiPath Explorer – UiPath Documentation Portal
Activities – Advanced descriptor configuration – UiPath Documentation Portal Studio – Image – UiPath Documentation Portal
What is the purpose of credential stores in UiPath Orchestrator?
- A . To store non-sensitive data and configuration settings for UiPath Studio projects.
- B . To store Orchestrator event loos and related data for auditing purposes.
- C . To securely store sensitive data such as Robot credentials and Credential Assets for use in automation processes.
- D . To serve as a centralized location for storing pre-built automation workflows and processes.
C
Explanation:
The purpose of credential stores in UiPath Orchestrator is to securely store sensitive data such as Robot credentials and Credential Assets for use in automation processes. Credential stores are external services that provide encryption and protection for sensitive data. Orchestrator can integrate with various credential stores, such as CyberArk, Azure Key Vault, and HashiCorp Vault, and use them to store and retrieve the credentials for the Robots and the Credential Assets. Credential Assets are global variables that can store passwords, usernames, API keys, and other confidential information. By using credential stores, the developer can ensure that the sensitive data is not exposed or compromised, and that the automation processes can access the data securely and efficiently.
Reference: [Credential Stores], [Credential Assets]
A developer implemented a process using the Robotic Enterprise Framework and an Orchestrator queue. The MaxRetryNumber from the "Config.xlsx" file is set to "1" and the Max # of retries from the Queue settings from Orchestrator is set to "2". At runtime, the first transaction item throws a Business Exception.
How many times will the transaction be retried?
- A . The transaction will not be retried.
- B . The transaction will be retried only one time.
- C . The transaction will be retried 2 times.
- D . The transaction will be retried multiple times, until it will be processed successfully.
B
Explanation:
The transaction will be retried only one time because the MaxRetryNumber from the “Config.xlsx” file is set to “1”. This parameter determines how many times a transaction item is retried when it fails with an application or a business exception. The Max # of retries from the Queue settings from Orchestrator is set to “2”, but this parameter only applies to the queue items that are marked as “Retry” by the robot. In the Robotic Enterprise Framework, the SetTransactionStatus workflow marks the queue items as “Retry” only if the MaxRetryNumber is not reached. Therefore, the first transaction item will be retried once by the robot and then marked as “Failed” in the queue, regardless of the Orchestrator setting.
Where in the REFramework template project is the "SetTransactionStatus.xaml" invoked?
- A . In the Finally section of the Try Catch activity in the End Process state.
- B . In the Try section of the Try Catch activity in the End Process state.
- C . In the Try and Catches sections of the Try Catch activity in the Process Transaction state.
- D . In the Try section of the Try Catch activity in the Process Transaction state.
Which of the following describes the correct hierarchy of the elements in the Object Repository tree structure?
- A . Version, Application, Screen, Ul Element.
- B . Application, Version, Screen, Ul Element.
- C . Application, Screen, Ul Element, Version.
- D . Screen, Application, Version, Ul Element.
C
Explanation:
The Object Repository in UiPath organizes elements in a hierarchical structure that reflects the logical arrangement of user interfaces and elements as they are captured and used in automation projects. The correct hierarchy for elements in the Object Repository tree structure is:
Which of the following statements is true about the existing UiPath Studio installation packages?
- A . The Attended Robot installation package installs only the UiPath Robot.
- B . The Unattended Robot installation package installs only UiPath Studio, Assistant, and Robot.
- C . The Attended Robot installation package installs only UiPath Studio, and Robot.
- D . The Automation Developer installation package installs only UiPath Studio, Assistant, and Robot.
A
Explanation:
The statement that is true about the existing UiPath Studio installation packages is that the Attended Robot installation package installs only the UiPath Robot. The UiPath Robot is the component that executes the automation workflows designed in UiPath Studio. The Attended Robot installation package is intended for scenarios where the Robot works on the same machine as a human user and requires human input or supervision. The Attended Robot installation package does not include UiPath Studio or UiPath Assistant. UiPath Studio is the component that allows the developer to design and debug the automation workflows. UiPath Assistant is the component that allows the user to manage and run the automation workflows on their machine. The Unattended Robot installation package and the Automation Developer installation package both include UiPath Studio, UiPath Assistant, and UiPath Robot, but they are intended for different scenarios. The Unattended Robot installation package is for scenarios where the Robot works on a dedicated machine and does not require human input or supervision. The Automation Developer installation package is for scenarios where the developer needs to create and test the automation workflows on their machine.
Reference: [UiPath Installation Guide], [UiPath Robot], [UiPath Studio], [UiPath Assistant]
When developing a new project using REf ramework. logging in to multiple applications Is required.
What is the recommended location to accomplish this task?
- A . InitAIIApplicatlons.xaml
- B . InitAIISettings.xaml
- C . Process.xaml
- D . FirstRun.xaml
A
Explanation:
In the REFramework (Robotic Enterprise Framework), the initialization of all required applications should ideally be done in the ‘InitAllApplications.xaml’ file. This helps in keeping the project organized and maintains a standard structure.
When developing a process, you were provided with two data tables, "DT1" and "DT2", as shown below:
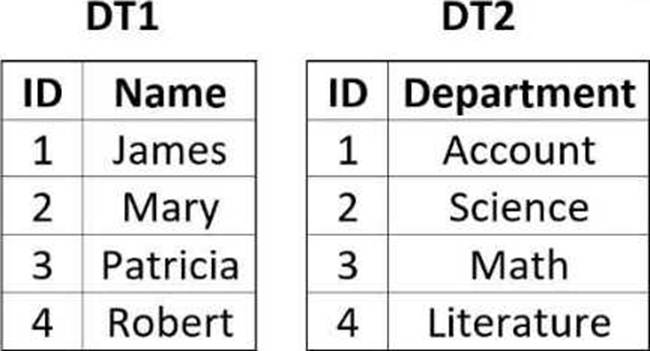
The process documentation specifies that the two data tables need to be manipulated in order to reflect the following "DT2":
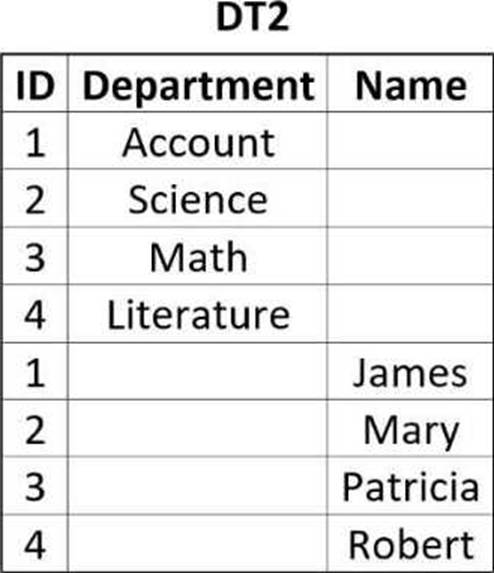
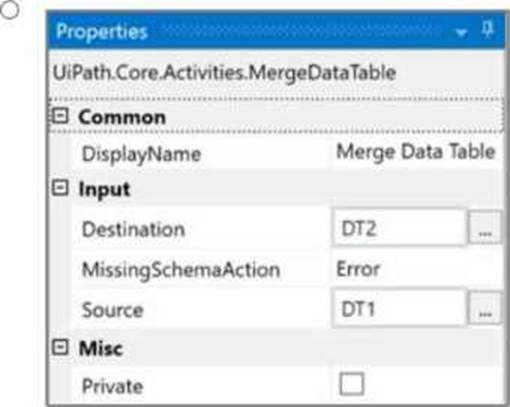
How should the properties of the Merge Data Table activity be configured?
A)

B)
C)

D)
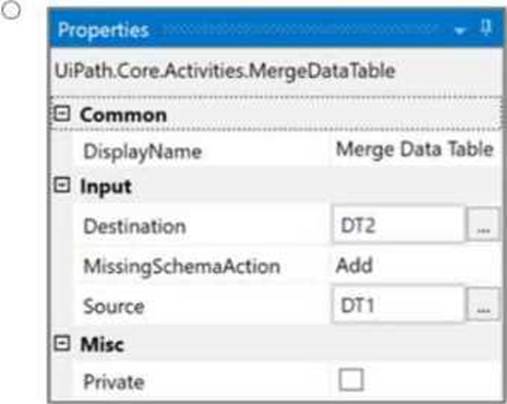
- A . Option A
- B . Option B
- C . Option C
- D . Option D
A
Explanation:
Given the two data tables DT1 and DT2, to achieve the desired result where DT2 contains both the department and the names, the Merge Data Table activity should be configured to merge DT1 into DT2. This configuration requires specifying DT1 as the source table and DT2 as the destination table. The MissingSchemaAction should be set to AddWithKey which ensures that if the source table (DT1) contains columns that are not found in the destination table (DT2), they will be added to the destination table with the primary key information preserved.
Option A shows the correct configuration for the Merge Data Table activity to achieve this result:
Destination: DT1
Source: DT2
MissingSchemaAction: AddWithKey
This setup correctly adds the "Name" column from DT1 to DT2 based on the shared "ID" column, which acts as the key. Since both tables have an "ID" column with matching values, the names will be added to the corresponding IDs in DT2, resulting in a merged table with ID, Department, and Name columns.