
Practice Free PEGACPRSA22V1 Exam Online Questions
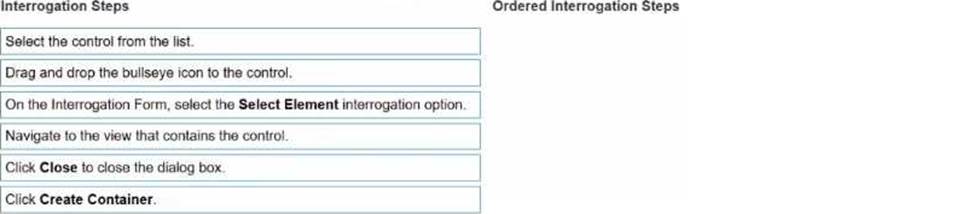
An Insurance Call Center project requires the use of the Interaction Framework. The supporting applications should perform specific work when processing claims. The claim requires the claim number and the claim date, but it may also share other claim information in the interaction’s context values.
Based on the information, which interaction.xml activity entry configures the project requirements?
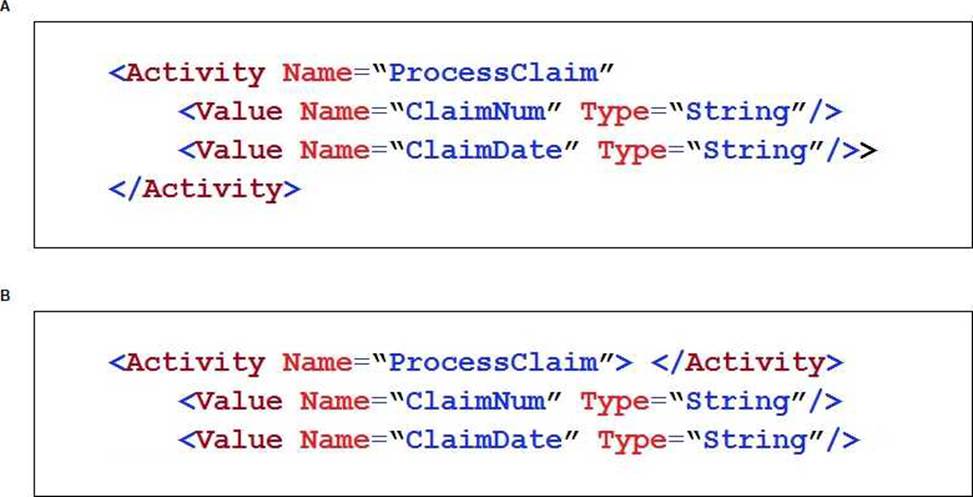
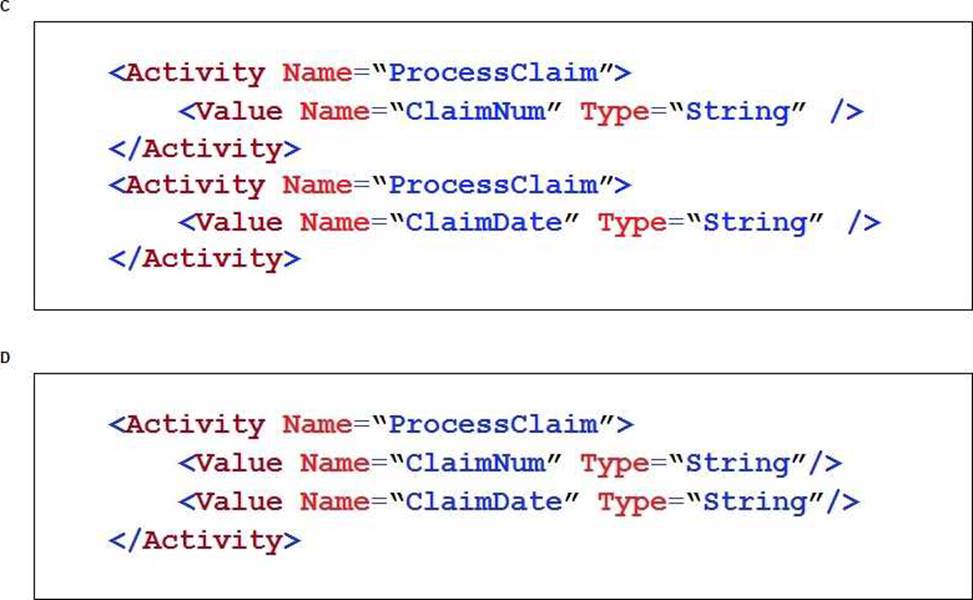
- A . Exhibit A
- B . Exhibit B
- C . Exhibit C
- D . Exhibit D
A project requirement is to run the solution in multiple environments: Development and Production.
Which two items can be added to the two Project Configuration files? (Choose two.)
- A . Variable values
- B . Citrix Context properties
- C . Adapter Text MatchRules
- D . Project properties
DRAG DROP
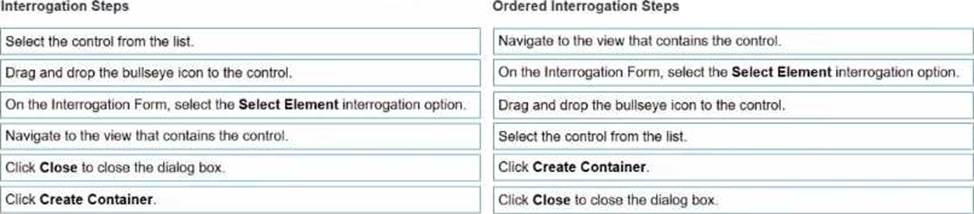
When interrogating a single-page web application, you need to create a container for the logical page view. You decide to use the Select Element in the Interrogation Steps list, move the options to the Ordered Interrogation Steps column and place them in the correct order.
Explanation:
When interrogating a single-page web application (SPA), controls often reside within dynamic DOM regions or logical page views that reload content without changing the page URL.
To effectively interrogate such controls, developers must create containers that define a logical grouping for the dynamic content―allowing Pega Robot Studio to maintain proper context when referencing those controls.
According to the Pega Robotics System Design and Implementation Guide, section “Interrogating
Single-Page Web Applications”:
“When interrogating single-page web applications (SPA), developers must first create a container that represents the logical view within which controls exist.
Navigate to the page or view where the target control appears.
In the Interrogation Form, select Select Element to enable control selection mode.
Use the Bullseye tool to highlight and select the control or parent HTML element.
From the list of detected controls, choose the desired control to bind.
Click Create Container to define the logical page grouping for the interrogated control.
Click Close to exit the dialog once the container has been successfully created.”
Detailed Step Reasoning:
Navigate to the view that contains the control.
Ensures that the desired control is visible within the web application’s dynamic content area.
On the Interrogation Form, select the Select Element interrogation option.
Activates the Select Element mode, allowing you to interrogate web-based elements precisely.
Drag and drop the bullseye icon to the control.
Highlights the specific control in the web application that you want to interrogate.
Select the control from the list.
Confirms which element to bind from the list of detected elements in the DOM.
Click Create Container.
Creates a container object in the automation hierarchy that represents the logical view of the web application (essential for SPAs).
Click Close to close the dialog box.
Completes the interrogation process and finalizes the container creation.
Final Ordered Steps:
Order Interrogation Step
1 Navigate to the view that contains the control.
2 On the Interrogation Form, select the Select Element interrogation option.
3 Drag and drop the bullseye icon to the control.
4 Select the control from the list.
5 Click Create Container.
6 Click Close to close the dialog box.
Reference: Extracted and verified from Pega Robotics System Design and Implementation Guide, Interrogating Single-Page Applications and Creating Logical Containers section (Pega Robotics 19.1 and later).
During application discovery of a Clarify application, you determine that the user accesses more than one customer case concurrently within the application, which creates multiple windows of the same type. This requires you to enable the UseKeys property on an application’s object.
Based on the image that shows the application and the matched controls in the Object Explorer, which control’s UseKeys property must be set to True?
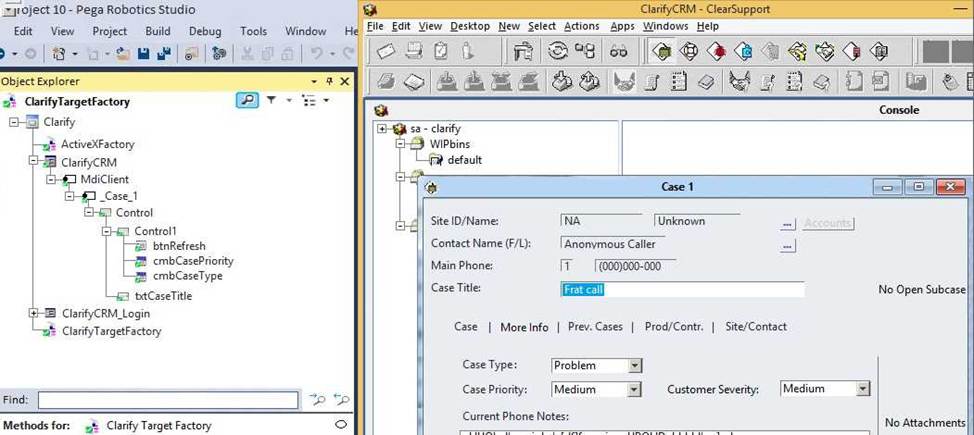
- A . ClarifyCRM
- B . MdiClient
- C . _Case_1
- D . Control
During application discovery, what three things must the developer notice about the application to help design the automation? (Choose three.)
- A . How users interact with the applications
- B . How the adapter process data
- C . How the application responds during use
- D . How the application processes data
- E . How the automation responds to the process
A,C,D
Explanation:
Application discovery is an early technical validation step that involves collecting the information about applications in scope of a potential robotics use case. During discovery you need to find out application types (and if they are on applications support matrix for Pega Robotics), how they are launched, how they are used, and check accessibility and functionality of the controls through interrogation. Application discovery is necessary to ensure that robotics use case is viable and it doesn’t have any technical constraints… or, if constraints exist, then what kind of workarounds will be necessary to ensure the use case is successful. The rationale for having application discovery as a best practice is that you don’t want to find out half-way through coding an automation that a key control is not available or not performing the desired action.
Which three statements describe the characteristics of unattended automations? (Choose Three)
- A . They retrieve the next case assignment in a robotic work queue.
- B . They execute a fully automated task.
- C . They can streamline and automate portions of your case management workflow.
- D . They run during pre-processing to obtain information to display on a form.
- E . They complete the automated tasks based on user input.
A, B, C
Explanation:
Comprehensive and Detailed Explanation From Pega Robotics System Exact Extract:
Unattended automations, also referred to as Robotic Process Automations (RPA), are automations that execute without human intervention. These automations operate on robotic work queues managed by Pega Robot Manager, performing background tasks automatically.
According to the Pega Robotics System Design and Implementation Guide, section “Unattended
Automations (RPA) ― Execution Model and Characteristics”:
“Unattended automations execute robotic tasks in a fully automated manner without user interaction.
They retrieve assignments from robotic work queues in Pega Robot Manager, perform the specified automation tasks, and return results and case updates to Pega Platform.
These automations help streamline business workflows by automating repetitive tasks in back-end processes.”
Detailed Reasoning:
Which responsible for sending the deployment package to the customer. You want to build your project to work with the test and production Human Resource (HR) systems…….. 1 have different access points for the HR applications.
How can you design a single project to work in both systems?
- A . Create one environment override for the HR System project; the override contains both the production and test details.
- B . Add two applications for the HR Project: one application for production, and one application for test.
- C . Add two environment overrides and two applications for the HR project: one override and application for production, and the other override and application for test.
- D . Create two environment overrides for the HR System project: one override for production, and one for test.
D
Explanation:
In Pega Robot Studio, an environment override allows developers to configure multiple deployment environments (such as test, staging, and production) using a single project. This helps you avoid creating separate projects for each environment and ensures consistent automation logic while dynamically switching between environment-specific settings at runtime.
According to the Pega Robotics System Design and Implementation Guide, section “Managing
Environment Overrides and Multi-Environment Deployments”:
“Environment overrides provide a mechanism to define environment-specific configuration values for applications within a project.
For example, the same automation logic can be used for both test and production systems by creating separate environment override files ― one for the test environment and one for the production environment ― each specifying unique paths, credentials, or URLs for the corresponding system.”
Detailed Reasoning:
The HR system has different access points for test and production, which typically means different URLs or executable paths.
The automation logic (how the robot interacts with the HR application) remains identical; only the connection configuration changes.
Therefore, instead of creating multiple applications or modifying logic, you configure two environment override files ― one for production and one for test ― each defining environment-specific details such as:
Application path (for Windows adapters)
StartPage URL (for web adapters)
Credentials or runtime parameters
This allows a single automation project to adapt dynamically based on which environment override is active during deployment or testing.
Option Analysis:
An attended automation sources a data page to populate properties in your Pega application. Though several debugging tests show the automation executing fully, the automation does not properly source the data page in time to return the values to the Pega application.
This issue may be a result of which one of the options below?
- A . The automation runs longer than the default data page timeout of 60 seconds.
- B . The robot activity ClassName property value is incorrect.
- C . The automation runs faster than the data page can perform a data transform.
- D . The automation does not return the proper SetCompletionStatus.
A
Explanation:
Comprehensive and Detailed Explanation From Pega Robotics System Exact Extract:
In Pega, when a data page is configured with a Robotic Desktop Automation (RDA) as its source, the automation must complete execution and return its response within a predefined timeout period. The default timeout value for data pages calling robotic automations is 60 seconds.
According to the Pega Robotics System Design and Implementation Guide, section “Data Page Integration with Robotic Desktop Automations”:
“When a Pega data page calls a robotic automation as its data source, the automation must complete and return its data within the timeout threshold.
If the automation’s execution time exceeds the timeout period (default 60 seconds), the data page fails to receive the response, resulting in an empty or incomplete data return to Pega Platform.”
Detailed Reasoning:
If the automation executes successfully but takes longer than the defined timeout, the Pega Platform assumes the call failed and releases the data page before the response arrives.
This causes the data page not to be populated, even though the Robot Studio logs show successful automation completion.
Increasing the timeout value or optimizing automation performance typically resolves this issue.
Option Analysis:
DRAG DROP
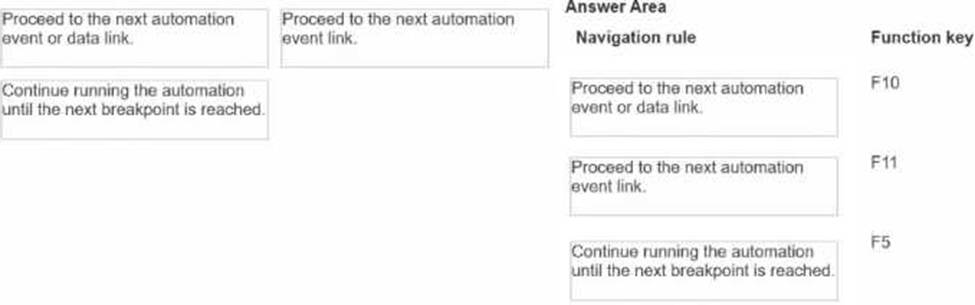
When you debug an automation, you have three function keys to use for navigating the breakpoints.
Drag each navigation rule on the left to the box next to the correct function key on the right.
Explanation:
When debugging automations in Pega Robot Studio, developers use specific function keys to control the flow of execution at breakpoints. Each key provides a distinct method for navigating through the automation logic during a debugging session.
According to the Pega Robotics System Design and Implementation Guide, section “Debugging
Automations ― Function Keys and Breakpoint Navigation”:
“During debugging, Pega Robot Studio allows you to step through the automation’s logic using three primary navigation commands:
F10 (Step Over): Executes the current step and proceeds to the next event or data link, without stepping into nested automations or sub-events.
F11 (Step Into): Executes the current step and enters any nested event link or sub-automation to debug internal logic.
F5 (Continue): Continues running the automation until the next breakpoint is encountered.”
Detailed Reasoning:
F10 C Step Over
Moves to the next automation event or data link at the same level.
Skips over nested or child automations while still executing them.
F11 C Step Into
Moves into the next automation event link or nested automation to debug its internal process.
Useful when you need to analyze detailed event flow inside another automation.
F5 C Continue
Resumes automation execution at normal speed until it encounters the next breakpoint or finishes.
Used to verify execution results after setting conditional breakpoints.
Reference: Extracted and verified from Pega Robotics System Design and Implementation Guide, Debugging Automations C Step Over, Step Into, and Continue Execution section (Pega Robotics 19.1 and later).
You are deploying a robotic project to Pega Robot Manager.
Which file stores the Pega Robot Manager server settings?
- A . PegaStudioConfig.xml
- B . CommonConfig.xml
- C . PegaRuntimeConfig.xml
- D . PegaConfig.xml
B
Explanation:
Comprehensive and Detailed Explanation From Pega Robotics System Exact Extract:
When deploying robotic solutions to Pega Robot Manager, the connection and authentication details ― such as Robot Manager server URL, authentication mode, and registration configuration ― are stored in the file CommonConfig.xml.
This configuration file is shared between both Pega Robot Studio and Pega Robot Runtime, ensuring that both use consistent connectivity settings.
According to the Pega Robotics System Design and Implementation Guide, section “Pega Robot Manager Integration and Configuration Files”:
“The CommonConfig.xml file contains shared configuration information that is used by both Pega
Robot Studio and Pega Robot Runtime.
It includes global settings such as:
Connection information for Pega Robot Manager (URL, ports, authentication)
Deployment configuration values
Environment registration and runtime connectivity settings.
PegaRuntimeConfig.xml and PegaStudioConfig.xml are used for local settings only, while CommonConfig.xml stores the Robot Manager connection configuration used during deployment.”
Detailed Reasoning: