
Practice Free MB-280 Exam Online Questions
You need to build a trigger-based journey to send the "Getting started" emails requested by the global sales lead.
Which trigger should you use to start the journey?
- A . Dataverse record change trigger
- B . Custom trigger with lead profile data
- C . Custom trigger with contact profile data
- D . Email Link Clicked interaction trigger
A
Explanation:
To build a trigger-based journey that sends "Getting started" emails when an opportunity is marked as "Won," the appropriate trigger to use is the Dataverse record change trigger. This trigger is specifically designed to initiate actions based on changes in Microsoft Dataverse records, which are integral to Dynamics 365.
Here’s the detailed reasoning:
Dataverse Record Change Trigger:
The Dataverse record change trigger is used to initiate journeys when there is a change in a record within Dataverse, such as an opportunity’s status.
Since the requirement is to send a "Getting started" email once an opportunity status changes to "Won," this trigger can detect the status update in real-time.
Using this trigger, you can specify the criteria for the journey to start, such as filtering for opportunities with a status of "Won," thus automating the email sending based on this condition.
Why Not Other Triggers?
Custom trigger with lead profile data and Custom trigger with contact profile data: These are generally used for initiating journeys based on custom events or data points outside of standard Dataverse records, which isn’t applicable here as the journey is triggered by an opportunity status change, a native Dataverse record.
Email Link Clicked Interaction Trigger: This trigger is used to follow up after an email link is clicked, which does not align with the scenario. The journey must start based on an opportunity status change, not email interaction.
Microsoft Dynamics 365
Reference: Create and manage trigger-based journeys
Work with Dataverse triggers in journeys
By using the Dataverse record change trigger, you ensure that the journey aligns directly with the sales process and automatically sends the "Getting started" email when an opportunity reaches the "Won" status, as requested by the global sales lead.
You created and published lead scoring models in the Dynamics 365 Customer insights – Journeys application.
Your marketing team members inform you that they are NOT able to view the lead scoring insights.
You confirm the lead scoring models are published and are Live.
You need the marketing team to be able to view the lead scoring insights.
- A . Re-publish the lead scoring models to allow the system to capture the insights.
- B . Assign the Lead Score Viewer security role to the users.
- C . Set all leads to Active state to capture the insights.
- D . Set automatic lead scores cleanup to No lo capture the scoring.
B
Explanation:
For team members to view lead scoring insights, they must have appropriate permissions, specifically the Lead Score Viewer role in Dynamics 365 Customer Insights – Journeys.
Even though the lead scoring models are published and live, without the correct security role, users will not have access to view the insights.
Assigning the Lead Score Viewer role ensures that the users have the necessary access rights to review the lead scoring insights generated by the models.
Reference: Microsoft Documentation – Configure Security Roles for Lead Scoring
You need to ensure the active stage of the business process flow is visible in the view.
Which two actions should you perform? Each correct answer presents a complete solution. NOTE: Each correct selection is worth one point. Choose two.
- A . Add a page for the Onboard new pet table to the Sales Professional app.
- B . Add columns from the stable to the Active Onboard new pet view.
- C . Add columns from the Pet table to the All Onboard new pet view.
- D . Create a new column on the Pet table named "Onboarding stage" and add it to the Active pets view.
BD
Explanation:
Adding Columns to the Active Onboard New Pet View (Option B):
To display the current active stage of the "Onboard new pet" business process flow, you need to ensure that the Active Onboard new pet view includes relevant columns from the Pet table, specifically those tracking process flow stages.
Creating and Adding a New "Onboarding Stage" Column (Option D):
Creating a column such as "Onboarding stage" on the Pet table helps track the active stage of the
onboarding process directly within the view. This allows users to see at a glance which stage each pet
is in without navigating away from the main view.
Other Options:
Option A (Adding a page) refers to modifying the app’s navigation, which doesn’t directly impact the visibility of the business process flow stage.
Option C (All Onboard New Pet View) may not be as relevant if you only need to focus on active onboarding records rather than all records.
Reference from Microsoft Documentation:
For configuring views and columns in Dynamics 365, refer to Create and edit views.
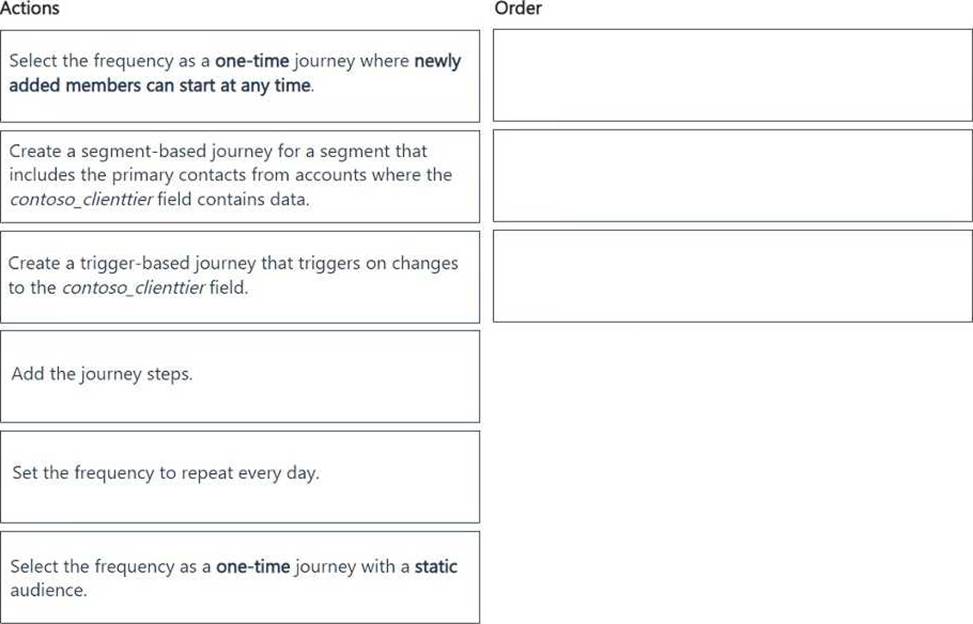
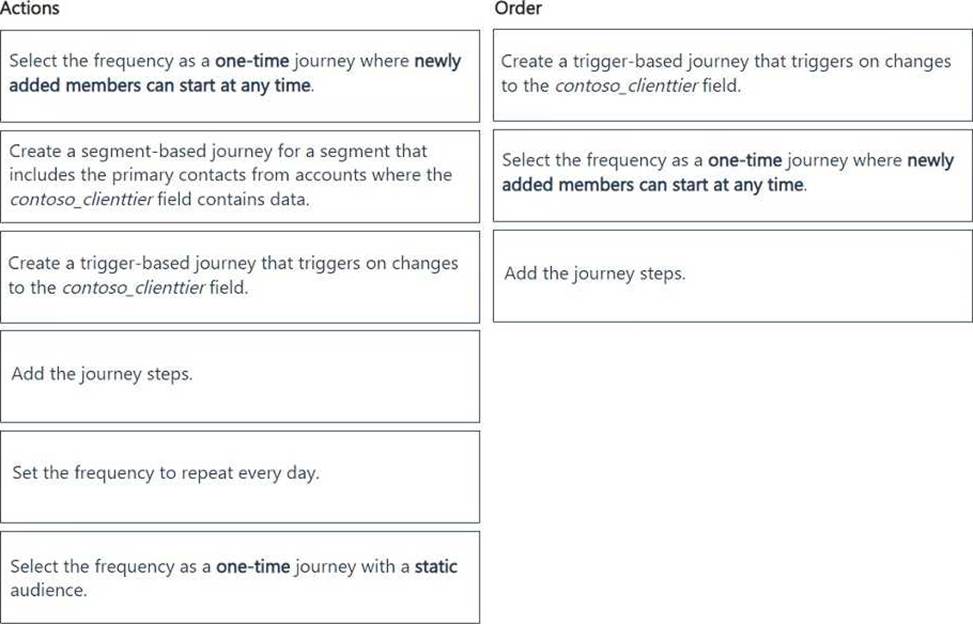
DRAG DROP
You need to create and start a new customer journey to send "Welcome" emails to new customers.
Which three actions should you perform in sequence before you publish the journey? To answer, move the three appropriate actions from the list of actions to the answer area. Arrange the three actions in the correct order.
Explanation:
DRAG DROP
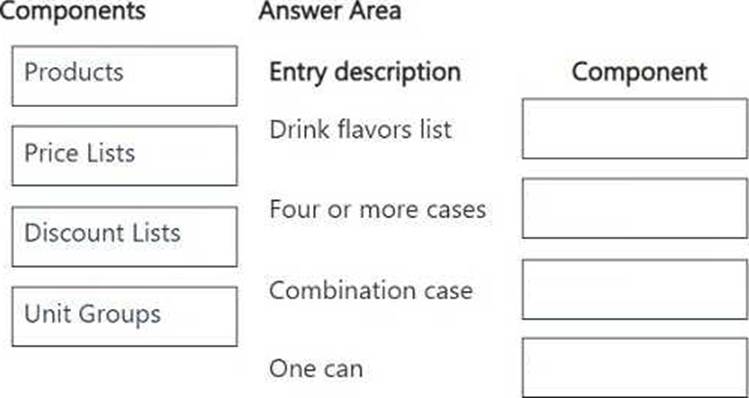
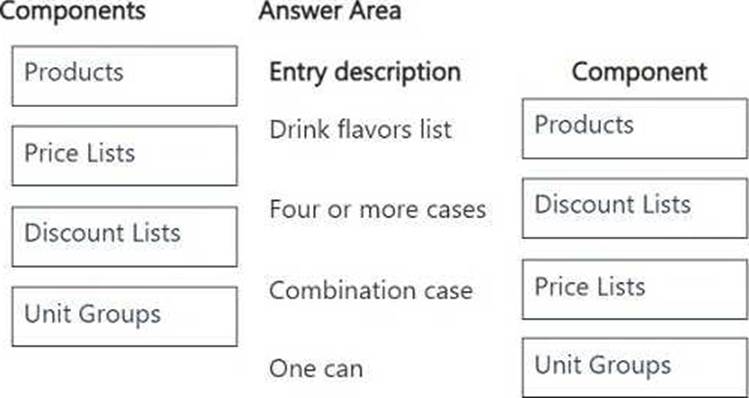
You are implementing Dynamics 365 Sales for a beverage company.
The company sells drinks by individual cans, by the dozen, or by the case of 48 cans as follows:
There are three flavors: strawberry, vanilla, and chocolate.
Each can costs $5.00.
A dozen cans cost $55.00.
Each case has four dozen cans and costs $200.00.
A combination case includes a dozen cans of each flavor and costs $160.00.
Purchases of four or more cases receive an extra 10 percent off the price.
You need to set up the product catalog.
Which components should you use? To answer, move the appropriate components to the correct entry descriptions. You may use each component once, more than once, or not at all. You may need to move the split bar between panes or scroll to view content. NOTE: Each correct selection is worth one point.
DRAG DROP
You are implementing Dynamics 365 Sales for a beverage company.
The company sells drinks by individual cans, by the dozen, or by the case of 48 cans as follows:
There are three flavors: strawberry, vanilla, and chocolate.
Each can costs $5.00.
A dozen cans cost $55.00.
Each case has four dozen cans and costs $200.00.
A combination case includes a dozen cans of each flavor and costs $160.00.
Purchases of four or more cases receive an extra 10 percent off the price.
You need to set up the product catalog.
Which components should you use? To answer, move the appropriate components to the correct entry descriptions. You may use each component once, more than once, or not at all. You may need to move the split bar between panes or scroll to view content. NOTE: Each correct selection is worth one point.
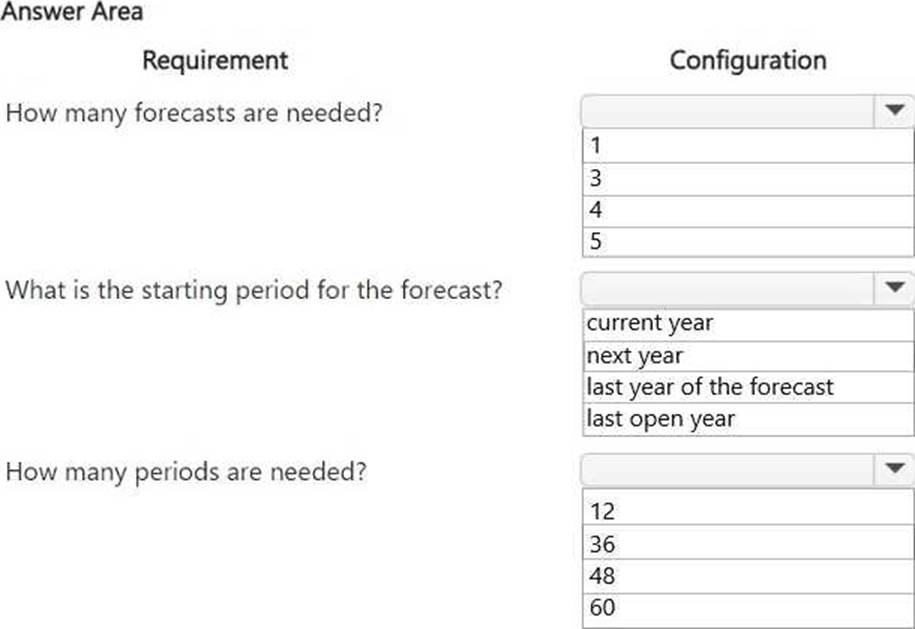
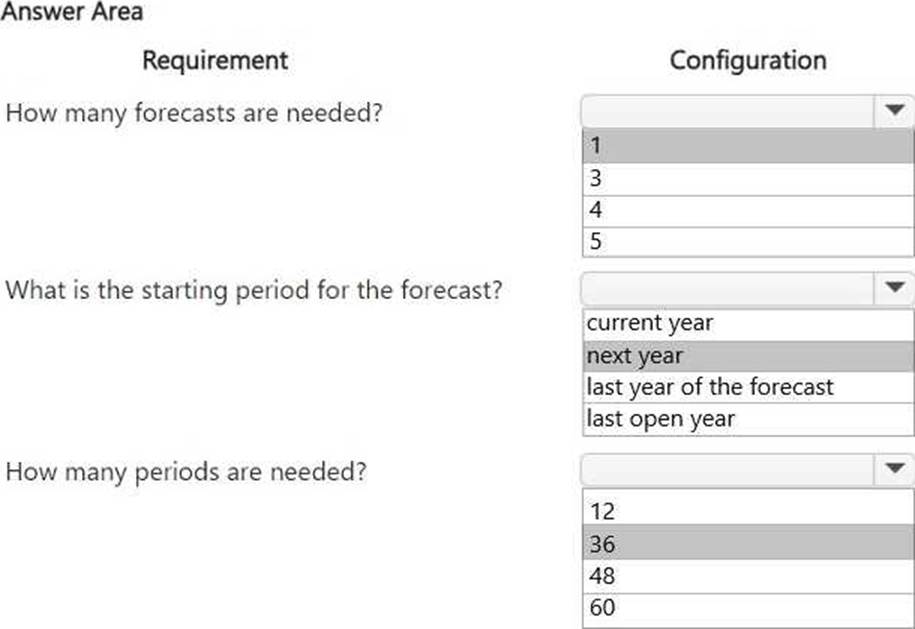
HOTSPOT
You are a Dynamics 365 Sales administrator. You set the fiscal year to begin in January.
A sales manager needs a monthly forecast for the next three years that starts in August of the next year.
You need to configure the forecast using the fewest number of forecasts.
How should you configure each requirement? To answer, select the appropriate options in the answer area. NOTE: Each correct selection is worth one point.
Note: This question is part of a series of questions that present the same scenario. Each question in the series contains a unique solution that might meet the stated goals. Some question sets might have more than one correct solution, while others might not have a correct solution.
After you answer a question in this section, you will NOT be able to return to it. As a result, these questions will not appear in the review screen.
A company’s IT department has a .CSV file stored on one of their Shared Documents folders within their Microsoft SharePoint sites. The data from the .CSV file is ingested into Dynamics 365 Customer Insights – Data.
The file contains a row header and columns of different types, such as quantities and prices. The file also contains some rows with a high proportion of nulls.
You need to clean and transform the data in Customer Insights – Data to be ready for unification.
Solution: Transform the first row to be used as headers, and remove any special characters or spaces from header row. Remove rows with missing primary keys and name the query. Select Next and your data is now ready for unification.
Does this meet the goal?
- A . Yes
- B . NO
B
Explanation:
Correct:
* Transform the first row to be used as headers. Define column types to be the appropriate field types and name the query. Create a full name and full address columns by merging the appropriate columns if they exist. Select Next and your data is now ready for unification.
The proposed solution effectively prepares the data for unification in Dynamics 365 Customer Insights – Data.
Here’s how each step contributes to meeting the goal:
Transform the first row to be used as headers: This step is necessary to define the column names, which is critical for accurate data interpretation.
Define column types to be the appropriate field types: Specifying the correct data types for each column ensures that the data will be processed correctly during unification, maintaining data integrity.
Create a full name and full address columns by merging the appropriate columns if they exist: This step enhances the dataset by consolidating relevant information into single columns, which can simplify data usage and improve data quality. Merging columns helps ensure that users can easily access essential information without navigating through multiple fields.
Select Next: This indicates that the data transformation steps are completed and the dataset is ready for the unification process.
Incorrect:
* Define column types to be appropriate field types and name the query. Create a full name and full address columns by merging the appropriate columns, if they exist. Select Next and your data is now ready for unification.
Does not address the problem with null values.
* Remove any rows where the primary key is missing, delete any leading or trailing zeros on the primary key, and name the query. Select Next and your data is now ready for unification.
Problem not related to the primary key.
* Transform the first row to be used as headers, and remove any special characters or spaces from header row. Remove rows with missing primary keys and name the query. Select Next and your data is now ready for unification.
Does not address the problem with null values.
* Transform the first row to be used as headers, define column types to be the appropriate field types and name the query. Select Next and your data is now ready for unification.
Solution removes all rows with null values, which can lead to significant data loss, especially if those rows contain important information.
It may compromise data quality by eliminating rows, which can impact analysis and insights.
* Transform the first row to be used as headers, remove rows that contain null values, and name the query. Select Next and your data is now ready for unification.
While the solution includes transforming the first row to be used as headers and naming the query, the step of removing rows that contain null values is problematic.
Removing all rows with null values can lead to significant data loss, particularly if those rows contain relevant information.