
Practice Free AZ-800 Exam Online Questions
You have an on premises Active Directory Domain Services (AD DS) domain that syncs with an Azure Active Directory (Azure AD) tenant. The domain contains two servers named Server1 and Server2.
A user named Admin1 is a member of the local Administrators group on Server1 and Server2.
You plan to manage Server1 and Server2 by using Azure Arc. Azure Arc objects will be added to a resource group named RG1.
You need to ensure that Admin1 can configure Server1 and Server2 to be managed by using Azure Arc.
What should you do first?
- A . From the Azure portal, generate a new onboarding script.
- B . Assign Admin1 the Azure Connected Machine Onboarding role for RG1.
- C . Hybrid Azure AD join Server1 and Server2.
- D . Create an Azure cloud-only account for Admin1.
B
Explanation:
Reference: In the Administering Windows Server Hybrid Core Infrastructure content for Azure ArcCenabled servers, the onboarding script (interactive or service-principal based) requires that the identity used to connect a machine has the least-privilege built-in role at the intended scope. The guide states that for scripted or portal onboarding you should “grant the Azure RBAC role Azure Connected Machine Onboarding at the subscription or resource-group scope to the identity that will run the connect process; this role includes only the permissions necessary to register and connect the server resource.” It also notes that no hybrid Azure AD join is required just to onboard Arc, and that local admin on the target server is sufficient for installing the Connected Machine agent. Therefore, before Admin1 runs the onboarding script for Server1 and Server2 into RG1, you must first assign Admin1 the Azure Connected Machine Onboarding role at RG1. This satisfies least privilege and enables the script to create the Microsoft.Hybrid Compute/machines resource entries and related artifacts while avoiding broader roles like Contributor or Owner.
DRAG DROP
You have a server named Server1.
You plan to use Storage Spaces to expand the storage available to Server1. You attach eight physical disks to Server1. Four disks are HDDs and four are SSDs.
You need to create a volume on Server1 that will use the storage on all the new disks. The solution must provide the fastest read performance for frequently used files.
Which three actions should you perform in sequence? To answer, move the appropriate actions from the list of actions to the answer area and arrange them in the correct order.
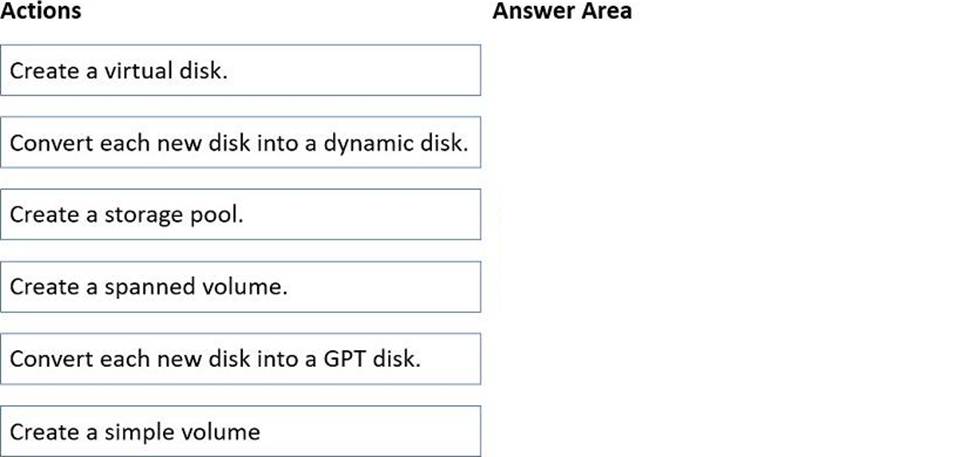
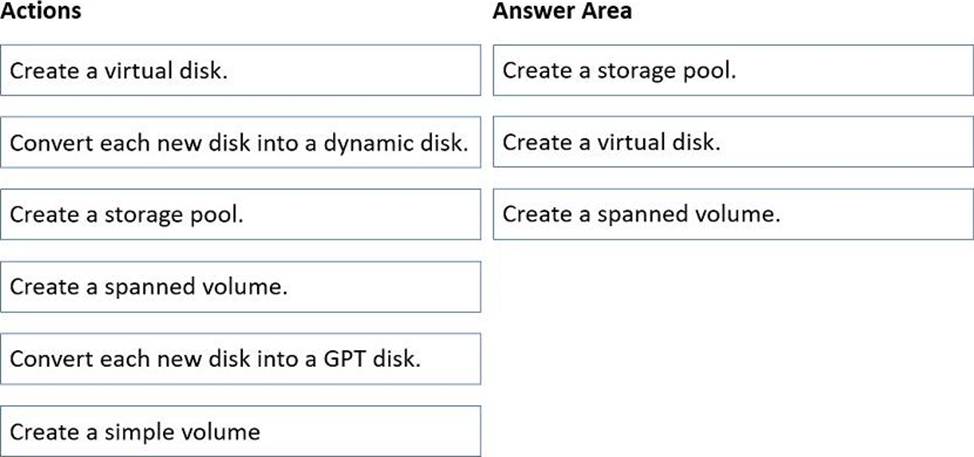
Explanation:
The Windows Server Storage Spaces guidance in Administering Windows Server Hybrid Core Infrastructure explains that expanding storage with heterogeneous media (HDD + SSD) is done by first aggregating physical disks into a storage pool, then carving that pool into one or more virtual disks that can use storage tiers. The materials state that a pool “abstracts a set of physical disks” and a virtual disk “exposes logical capacity and resiliency and can be configured with tiers such as an SSD performance tier and an HDD capacity tier,” allowing frequently accessed blocks to reside on SSD for faster read performance while colder data remains on HDD. After creating the virtual disk, you initialize it and create a volume (format with NTFS/ReFS) to make the capacity available to the OS. The study guide also notes that legacy dynamic/spanned volumes are not used with Storage Spaces, and converting disks to GPT is unnecessary for this scenario because the pool/virtual disk layer abstracts the underlying media. Therefore, the minimal, correct sequence to use all eight new disks and achieve the best read performance for hot data is: Create a storage pool → Create a (tiered) virtual disk → Create a simple volume.
You need to implement an availability solution for DHCP that meets the networking requirements.
Which two actions should you perform? Each correct answer presents part of the solution. NOTE: Each correct selection is worth one point.
- A . On DHCP1. create a scope that contains 25 percent of the IP addresses from Scope2.
- B . On the router in each office, configure a DHCP relay.
- C . DHCP2. configure a scope that contains 25 percent of the IP addresses from Scope 1 .
- D . On each DHCP server, install the Failover Clustering feature and add the DHCP cluster role.
- E . On each DHCP scope, configure DHCP failover.
B,E
Explanation:
In Administering Windows Server Hybrid Core Infrastructure, Microsoft states that high availability for DHCP on Windows Server is achieved by using DHCP failover rather than the legacy split-scope (80/20) model. The guidance explains that DHCP failover “synchronizes lease data between two DHCP servers and can be configured in Load Balance or Hot Standby mode on a per-scope basis,” and that you enable it on each DHCP scope to create a partner relationship that automatically replicates scope configuration and active leases. This meets the requirement to keep address assignment available if one DHCP server is down.
The same materials further note that DHCP broadcasts do not traverse routers; therefore, when the partner server is reachable across a routed boundary (another site/subnet), you must configure the router as a DHCP relay (IP helper) to forward DHCPDISCOVER messages to the remote DHCP server(s). The text emphasizes: “When clients and DHCP servers are on different subnets, configure a relay agent on the router to forward requests to the DHCP server IP addresses.”
Applying this to Fabrikam: create DHCP failover between DHCP1 (Scope1) and DHCP2 (Scope2) (E) and configure the routers in New York and Seattle as DHCP relays that forward to both DHCP servers
(B). You do not use Failover Clustering for DHCP here, and you do not create extra 25% scopes; those are split-scope practices superseded by DHCP failover.
You have an Active Directory Domain Services (AD DS) domain that contains the domain controllers shown in the following table.
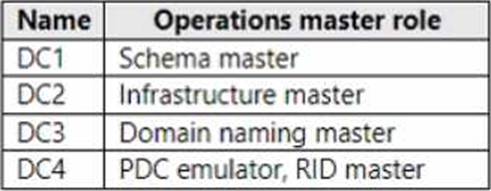
The domain contains an app named App1 that uses a custom application partition to store configuration data.
You decommission App1.
When you attempt to remove the custom application partition, the process fails.
Which domain controller is unavailable?
- A . DC1
- B . DC2
- C . DC3
- D . DC4
C
Explanation:
In the Windows Server hybrid administrator objectives for AD DS, application directory partitions (also called “naming contexts”) are forest-wide objects whose creation and deletion are controlled by the Domain Naming Master FSMO. The AZ-800 materials explain that operations which “add or remove naming contexts in the forest” must be performed on, or reachable by, the DC that holds the Domain Naming Master; if that role holder is unavailable, the operation fails until connectivity is restored or the role is transferred/seized. Because your custom application partition belongs to the forest schema of naming contexts, removing it requires contacting the Domain Naming Master. From the table, DC3 holds the Domain naming master role. Therefore, a failed attempt to delete the partition indicates the Domain Naming Master is not available, which points to DC3 being unavailable.
You are planning the implementation Azure Arc to support the planned changes. You need to configure the environment to support configuration management policies.
What should you do?
- A . Hybrid Azure AD join all the servers.
- B . Create a hybrid runbook worker m Azure Automation.
- C . Deploy the Azure Connected Machine agent to all the servers.
- D . Deploy the Azure Monitor agent to all the servers.
C
Explanation:
Within the hybrid governance section of Administering Windows Server Hybrid Core Infrastructure, Microsoft specifies that Azure ArcCenabled servers are the mechanism to bring on-premises and multi-cloud servers under Azure control to apply Azure Policy (Guest Configuration) and Defender for Servers. The prerequisite is installing the Azure Connected Machine agent (Azure Arc agent) on each server: “To manage servers with Azure Policy and configuration management, install the Connected Machine agent to onboard them to Azure Arc; once connected, you can assign Azure Policy guest configuration and monitor compliance just like Azure VMs.” Hybrid Azure AD Join is unrelated to Azure Policy assignment; the Azure Monitor agent provides telemetry but does not onboard to Arc for policy governance; a hybrid runbook worker is for Automation runbooks, not for enforcing Azure Policy. Therefore, to “use Azure Policy to enforce configuration management policies on the servers in Azure and on-premises,” deploy the Azure Connected Machine agent to all servers to Arc-enable them and then assign the desired policies.
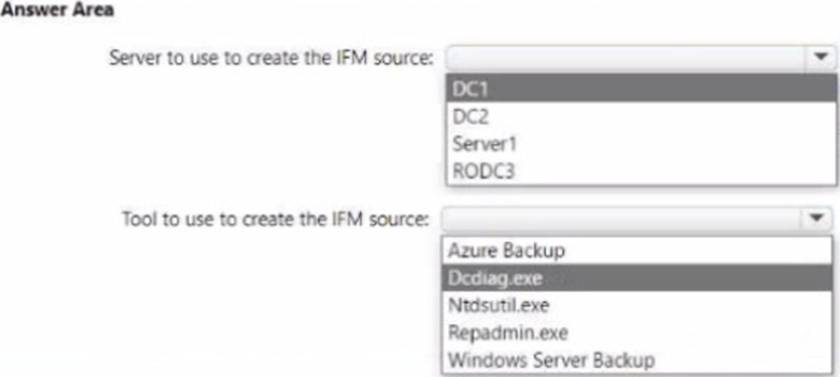
HOTSPOT
Your network contains a two-domain on-premises Active Directory Domain Services (AD DS) forest named Contoso.com.
The forest contains the domain controllers shown in the following table.

You create an Active Directory site named Site3. Site1, Site2 and Site3 each has a dedicated site link to the Hub site.
In Site3, you install a new server named Server1.
You need to promote Server1 to an ROOC in child.contoso.com by using the install from Media (IFM) option. The solution must minimize network traffic.
What should you do? To answer select the appropriate options in the answer area. NOTE: Each correct selection is worth one point.
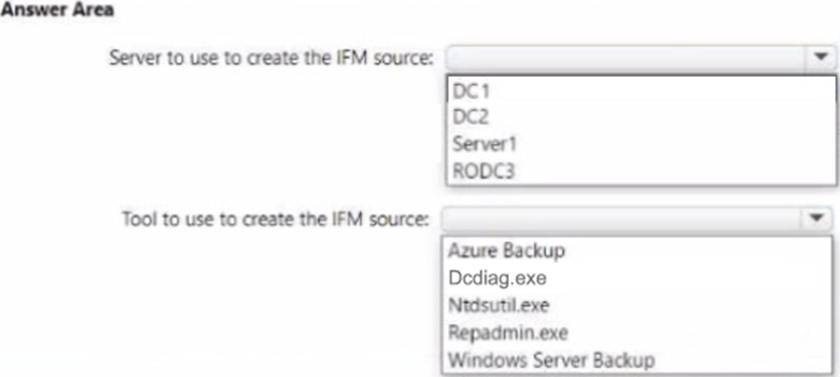
Explanation:
Within the Administering Windows Server Hybrid Core Infrastructure content for AD DS deployment, Microsoft specifies that Install From Media (IFM) for promoting a domain controller―especially a Read-Only Domain Controller (RODC)―must be created from a writable domain controller in the same target domain. The guide explains that IFM “pre-stages the AD DS database so that the promotion consumes far less replication traffic,” and it emphasizes: “RODC IFM cannot be generated from an RODC; it must be created on a writable DC of the destination domain.” It also clarifies tool choice: “Use ntdsutil ifm to generate media for a writable DC or an RODC. The media is then used during promotion to avoid full initial replication across the network.”
Applied here: the server to be promoted (Server1) will be an RODC in child.contoso.com. The only writable DC in that domain shown is DC2 (Domain-wide FSMO holder for child.contoso.com), making it the correct and traffic-efficient source. DC1 and RODC3 are in contoso.com (parent domain), so neither meets the requirement; additionally, an RODC cannot be used as an IFM source. Regarding tooling, the documentation notes that Windows Server Backup is for system-state backup/restore and is not the supported method to generate IFM media; the prescribed tool is Ntdsutil.exe with the IFM context. Therefore, to minimize network traffic and satisfy Azure/AD DS best practices, create the IFM media on DC2 using Ntdsutil.exe and then promote Server1 with that media.
HOTSPOT
You have an Active Directory Domain Services (AD DS) domain that contains a group named Group1.
You need to create a group managed service account (gMSA) named Account1. The solution must ensure that Group1 can use Account1.
How should you complete the script? To answer, select the appropriate options in the answer area. NOTE: Each correct selection is worth one point.


Explanation:
In the Administering Windows Server Hybrid Core Infrastructure materials for managing identity and AD DS, the guidance for creating group Managed Service Accounts (gMSAs) states that you use the New-ADServiceAccount cmdlet to create the account object and define both its service DNS identity and which principals are permitted to use it.
The document explains:
“Use New-ADServiceAccount to create a group managed service account. Specify the service name with -DNSHostName for SPN/DNS association. To control which computers or groups are allowed to run services under the gMSA, provide those principals with – PrincipalsAllowedToRetrieveManagedPassword. These security principals are then authorized to retrieve the managed password and use the account on the member servers.”
And further:
“The -PrincipalsAllowedToRetrieveManagedPassword parameter accepts computer accounts or security groups. Adding a group simplifies delegation―any computer that is a member of that group can use the gMSA without further modification.”
Applying this to the scenario, to create Account1 and ensure the domain group Group1 can use it,
the correct script is:
New-ADServiceAccount "Account1" -DNSHostName "website.contoso.com" – PrincipalsAllowedToRetrieveManagedPassword "Group1"
This satisfies the requirement by creating the gMSA and explicitly granting Group1 the right to retrieve and use the managed password on allowed hosts.
HOTSPOT
You have a server named Server1 that has the Hyper-V server role installed.
Server1 hosts the virtual machines shown in the following exhibit.
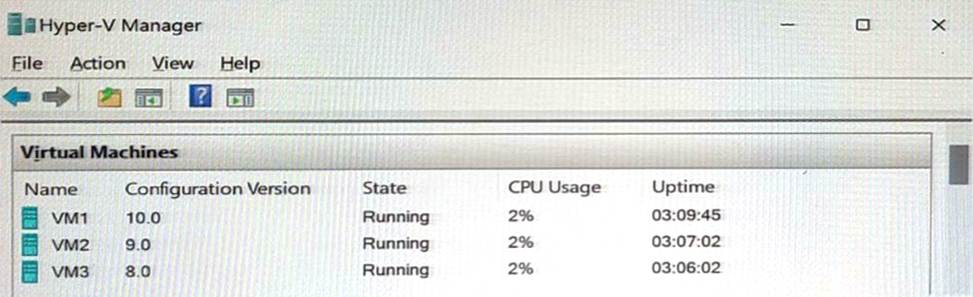
Use the drop-down menus to select the answer choice that completes each statement based on the information presented in the graphic. NOTE: Each correct selection is worth one point.
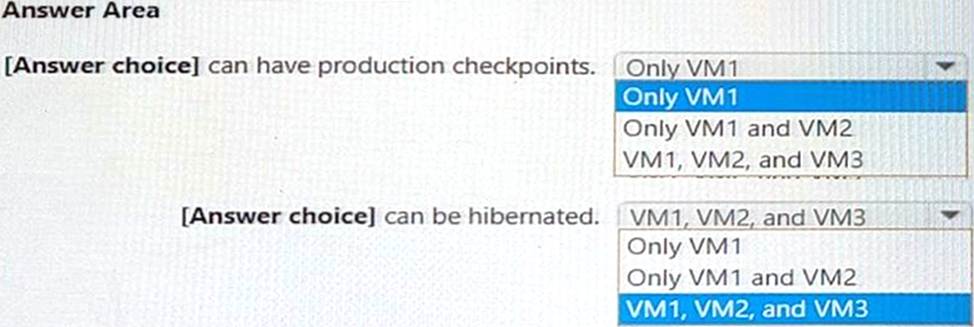
Explanation:
[Answer choice] can have production checkpoints. = VM1, VM2, and VM3 [Answer choice] can be hibernated. = Only VM1 and VM2
You have four testing devices that are configured with static IP addresses as shown in the following table.
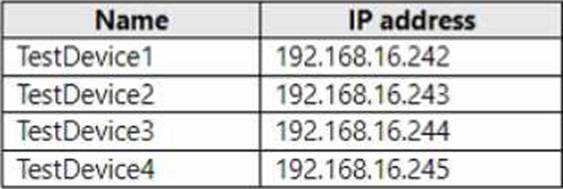
The test devices are turned on once a month.
You need to prevent Server1 from assigning the IP addresses allocated to the test devices to other devices when the test devices are offline. The solution must minimize administrative effort.
What should you do?
- A . Create an exclusion range.
- B . Create reservations.
- C . Configure the Scope options.
- D . Create a policy.
A
Explanation:
The DHCP planning and configuration section in Administering Windows Server Hybrid Core Infrastructure states: “Use exclusion ranges to prevent the DHCP Server from leasing specific addresses that are in use by statically assigned hosts.” Reservations are intended for DHCP clients that must always receive the same IP from the scope; they do not apply to devices configured with static IPs and would add unnecessary administration. Because the four test devices are statically addressed and are powered on only monthly, the simplest way to ensure the DHCP server never leases their addresses is to exclude those exact IP addresses from the scope. Scope options and policies do not reserve or block individual addresses from lease assignment. Therefore, to prevent conflicts with minimal effort, configure exclusion entries for 192.168.16.242C245 in the relevant scope.
Your network contains an Active Directory Domain Services (AD DS) domain.
You have a Group Policy Object (GPO) named GPO1 that contains Group Policy preferences.
You plan to link GPO1 to the domain.
You need to ensure that the preference in GPO1 apply only to domain member servers and NOT to domain controllers or client computers. All the other Group Policy settings in GPO1 must apply to all the computers. The solution must minimize administrative effort.
Which type of item level targeting should you use?
- A . Domain
- B . Operating System
- C . Security Group
- D . Environment Variable
B
Explanation:
Reference: In the Windows Server hybrid administration curriculum, Group Policy Preferences (GPP) support Item-level Targeting (ILT), which lets you apply a preference only when specific conditions are met, while the remainder of the GPO (regular policy settings) continues to apply wherever the GPO is linked. The guide explains that ILT can evaluate many attributes, including Operating System, where you can match by version, architecture, and crucially Product type. The product type values distinguish Workstation, Server, and Domain Controller. Using the Operating System targeting item to set Product type = Server ensures the preference applies to member servers only, because domain controllers report a different product type (Domain Controller) and client computers report Workstation.
This approach satisfies the requirement to link GPO1 at the domain level so that “all the other Group Policy settings in GPO1 apply to all computers,” while constraining only the GPP items to servers. It also meets the “minimize administrative effort” goal because it requires no OU restructuring and no additional security groups or WMI filters. In short, configure ILT on the specific GPP items within GPO1 using Operating System → Product type: Server; DCs and clients will not meet the targeting condition, so the preferences won’t apply to them, but the rest of the GPO will.